Bài 6. Xây dựng Restful API
Sử dụng Restful API NodeJS hướng dẫn cách gọi API trong trang web. Có thể gọi bằng hàm fetch, xmlHttpRequest, hay dùng thư viện Jquery, Axios, AngularJS, ReactJS …
Bài viết này hướng dẫn bạn dùng Fetch API (hàm fetch) và thư viện axios
Chuẩn bị để sử dụng restful api
Bạn phải có 1 bộ restful API cái đã rồi mới gọi được, ở bài hướng dẫn RESTful API trong NodeJS , bạn đã thực hiện với một bộ restful API cho product. Bây giờ bạn tạo nhanh một bộ khác (users) để phục vụ bài này nhé, cũng là dịp để ôn lại restful đã học ở bài trước.
1. Tạo database và table
- Vào phpmyadmin, tạo 1 database tên shop (nếu có rồi thì khỏi tạo)
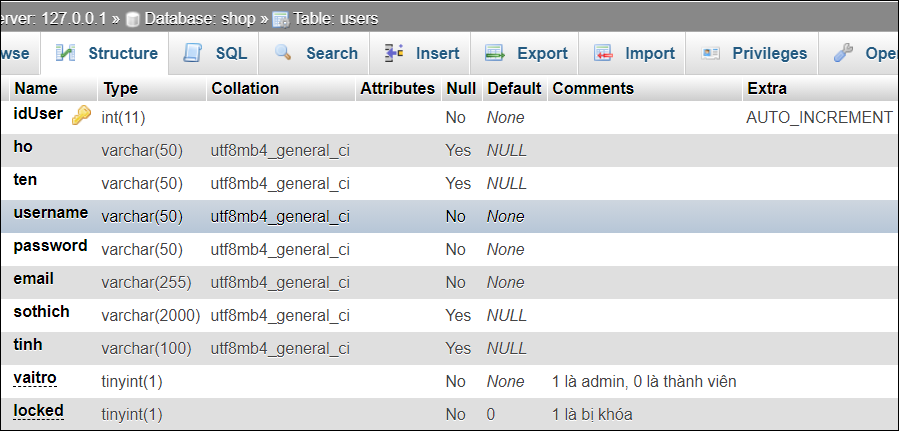
- Vào database shop, tạo table tên users như sau:
2. Cài module express và express-generator
Nếu máy của bạn đã cài rồi thì thôi bỏ qua, còn chưa thì mở command line rồi gõ lệnh npm install -g express , tiếp theo gõ lệnh npm -g install express-generator
3. Tạo project để thực tập
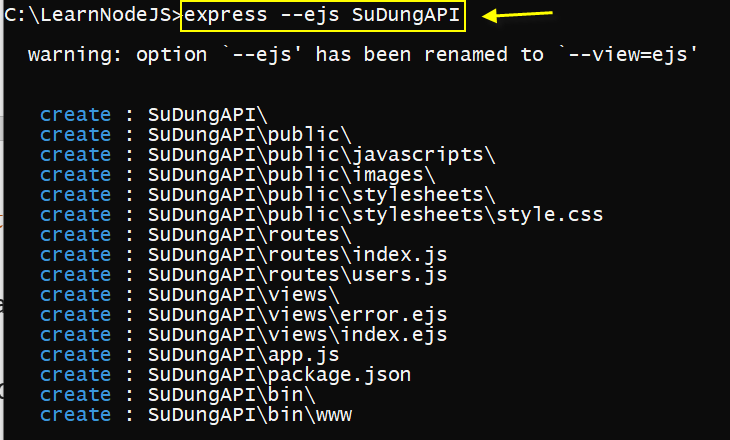
Vẫn trong command line rồi chạy lệnh:
express --ejs SuDungAPI
Chuyển vào folder SuDungAPI mới tạo và chạy lệnh cài đặt các module cần thiết
npm install
npm install mysql
4. Tạo model kết nối db
- Tạo folder models trong project
- Tạo file models/database.js
var mysql = require('mysql');
var db = mysql.createConnection({
    host: 'localhost',
    user: 'root',
    password: '',
    database: 'shop'
});
db.connect(function(err) {
   if (err) throw err;
   console.log('Da ket noi database');
});

//lệnh exports để xuất (public) ra cho bên ngoài module có thể dùng được db
module.exports = db;
- Tạo file models/users.js code định nghĩa các hàm để tương tác vào mysql
var db=require('./database');
exports.list = function( callback) {
    let sql = `SELECT *  FROM users`;
    db.query(sql, function(err, d) { callback(d); }  );
}
exports.create = function(data, callback ) { //hàm chèn user mới vào table
    let sql = 'INSERT INTO users SET ?';
    db.query(sql, data, function(err, d) { callback(d) }  );
}
exports.update = function(id, data, callback) {
    let sql = 'UPDATE users  SET ? WHERE idUser = ?';
    db.query(sql, [data, id], (err, d) => {
        if (err) throw err;
        callback();
    });
}
exports.read= function(id, callback) {
    let sql = 'SELECT * FROM users WHERE idUser = ?'
    db.query(sql, id, (err, d) => {
        data = d[0];
        callback(data);
    });
}
5. Tạo controller
Mở file app.js, bạn sẽ thấy lệnh app.use(‘/users‘, usersRouter); . Đường route users đã được express tạo sẵn cho bạn dẫn vào router(controller) users. Cứ để vậy khỏi tạo nữa (nhưng nếu muốn có thể sửa hoặc tạo mới)
Mở file routes/users.js và code:
var express = require('express');
var router = express.Router();
var db = require('./../models/database');
var modelUsers = require('./../models/users');

router.get('/',  (req, res) => {
    modelUsers.list( function(listusers) { res.json(listusers)} );
});
router.post('/', (req, res) => {
    let data = req.body;
	  modelUsers.create(data , function(){
        res.json({thongbao:"Đã thêm  xong một user mới"});
    });
 });
 router.get('/:id', (req, res) => {
    let id = req.params.id;
    modelUsers.read(id, function(u){
      res.json(u);
    });
 });
 router.put('/:id', (req, res)=> {
      let data = req.body;
      let id = req.params.id;
      modelUsers.update(id, data, function(){
        res.json({thongbao: 'Đã cập nhật user '});
      })
 });
 module.exports = router;
Test: Dùng postman để thực hiện test : xem danh sách user, xem chi tiết 1 user, thêm 1 user , cập nhật 1 user. Tất cả phải thành công nhé.
Việc chuẩn bị đã xong. Giờ thì gọi nó trong trang web thế nào? Mời bạn xem tiếp để biết sử dụng Restful API NodeJS.
Dùng hàm fetch() để gọi API
Trong Javascript, hàm fetch(url,options) là một hàm dùng để gửi và nhận request đến tài nguyên ở xa. Bạn dùng hàm này để thực hiện gọi các API đã tạo
Tạo request với method get
Dưới đây là cấu trúc cơ bản của hàm fetch để gọi 1 tài nguyên ở xa với method get. Nếu khi request mà có lỗi gì đó thì phần .catch sẽ chạy. Còn kết quả từ server sẽ truyền tới .then trong biến response, Bạn sử dụng biến response này để đánh giá kết quả trả về có ok không rồi chuyển nó thành các dạng dữ liệu cần thiết để xử lý ở các .then sau
window.fetch('http://…')
.then(function(response) {
  //đánh giá response và chuyển dữ liệu cho .then sau
})
.then(function(data) {
  // xử lý dữ liệu và chuyển dữ liệu cho .then sau
})
.then(function(data) {
  // xử lý dữ liệu
})
.catch(function(error) {
  console.log('Co loi : \n', error);
});
Ví dụ 1: Gọi hàm API
1. Tạo route: Mở routes/index.js và code
router.get('/danhsachuser', (req, res) => {
  res.render("listusers");
});
2. Tạo views/listusers.ejs
<h1>Danh sách users</h1>
3. Test: Chạy project (npm start) rồi mở trình duyệt gõ http://localhost:3000/danhsachuser , nếu thấy chữ Danh sách users là OK
4. Code gọi API trong views mới tạo (sau tag h1)
<script>
fetch("http://localhost:3000/users/")
.then(function(res) {
    console.log(res); //xem thử trong console của trình duyệt nhé
    if(!res.ok) {throw new Error("Lỗi = " + res.status); }
    return res.json();
})
.then(function(data) {
    console.log(data);
    //hiện data ra web (dùng foreach)
})
.catch(function(error)  {
    console.log("Lỗi: ", error);
})
</script>
Xem lại thử trang http://localhost:3000/danhsachuser , sẽ thấy trong console
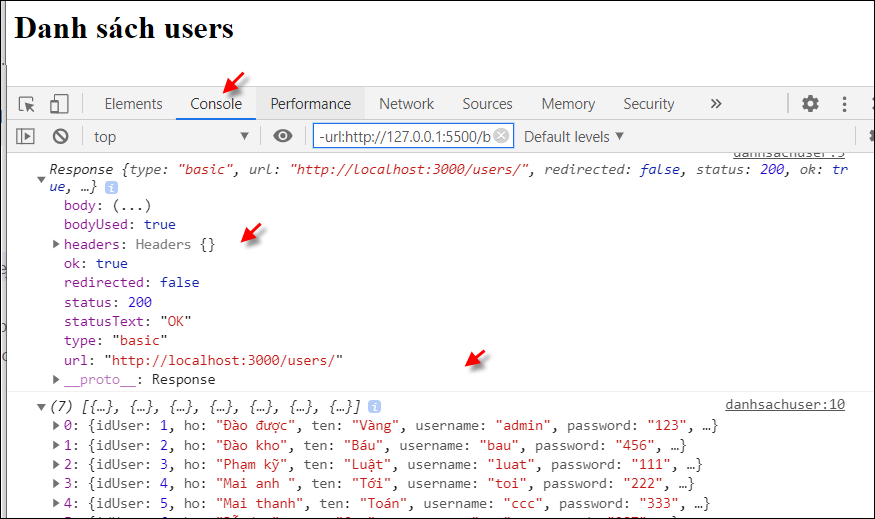
5. Hiện dữ liệu danh sách userra web
Trong trang listuser.ejs (sau h1) , tạo div
<div id=”listuser”></div>để chứa kết quả danh sách userCode tại vị trí hiện data ra web ở trên:
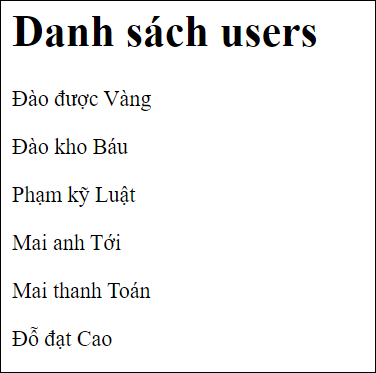
let kq = document.getElementById('listuser');
data.forEach( u => {
   kq.innerHTML+=`<p>${u.ho} ${u.ten}</p>`;
});
Xem thử kết quả: http://localhost:3000/danhsachuser , sẽ thấy kết quả, định dạng thêm cho đẹp nhé.
Đọc dữ liệu từ 1 object json
Object dữ liệu json đổ về từ server là dữ liệu dạng text có cấu trúc , được trình duyệt hỗ trợ nên rất dễ đọc.
Bạn hãy thử: Dùng trình duyệt xem API http://localhost:3000/users/1 sẽ thấy chi tiết user 1 ở dạng json. Request API rồi hiện ra rất dễ dàng
1. Tạo route: Mở routes/index.js và code
router.get('/chitietuser', (req, res) => {
  res.render("chitietuser");
});
2. Tạo views/chitietuser.ejs
<h1>Chi tiết user</h1>
3. Test: Chạy project (npm start) rồi mở trình duyệt gõ http://localhost:3000/chitietuser , nếu thấy chữ Chi tiết user là OK
4. Code gọi API trong views mới tạo (sau tag h1)
<h1>Chi tiết user</h1>
<div id="chitietuser"></div>
<script>
    fetch("http://localhost:3000/users/1")
    .then(function(res) {
        if(!res.ok) {throw new Error("Lỗi = " + res.status); }
        return res.json();
    })
    .then(function(data) {
        let str="";
        str+= "<p>Username: " + data.username+"</p>";
        str+= "<p>Họ: " + data.ho + "</p>";
        str+= "<p>Tên: " + data.ten + "</p>";
        str+= "<p>Tỉnh: " + data.tinh + "</p>";
        str+= "<p>Email: " + data.email + "</p>";
        str+= "<p>Sở thích: <br>" + data.sothich + "</p>";
        document.getElementById("chitietuser").innerHTML=str;
        console.log(data);
    })
    .catch(function(error)  { console.log("Lỗi: ", error);})
</script>
Kết quả bạn sẽ thấy dữ liệu thân thiện , theo cách bạn muốn trình bày cho user xem.
Gọi API với method POST
Hàm fetch(url,options) giúp gửi request đến tài nguyên ở xa, trong đó options là các cấu hình chi tiết cho hàm. Cách sử dụng thể hiện qua ví dụ sau:
- File routes/index.js
router.get('/dangky', (req, res) => {
  res.render("dangky");
});
- Tạo file views/dangky.ejs
<form name="frmdk">
    <p>Username: <input type="text" name="username"></p>
    <p>Password: <input type="password" name="password"></p>
    <p>Email: <input type="email" name="email"></p>
    <button type="button" onclick="dangky()">Đăng ký</button>
</form>
<script>
function dangky(){
   let un = document.frmdk.username.value;
   let pw = document.frmdk.password.value;
   let em = document.frmdk.email.value;
   let data = {
        username: un,
        password: pw,
        email:em
    }
    let url ="http://localhost:3000/users/";
    fetch(url, {
        method: "POST",
        body: JSON.stringify(data),
        headers: {"Content-type": "application/json; charset=UTF-8"}
    })
    .then(response => response.json())
    .then (function(data){
        document.frmdk.reset();
        console.log(data);
    })
    .catch(err => console.log(err));
}
</script>
- Test: http://localhost:3000/dangky ==> nhập thông tin rồi nhắp Đăng ký sẽ lưu thành công vào database.
Sử dụng thư viện Axios
Axios là một thư viện giúp bạn gửi http request đến các ứng dụng API. Axios được dùng cả ở trình duyệt hay Node.js. Sử dụng Restful API NodeJS sẽ dễ hơn với thư viện này.
Cài đặt axios
Cài Axios trong NodeJS đơn giản như bạn đã biết:
npm install axios
Trong trang html, nhúng axios:
<script src= “https://unpkg.com/axios/dist/axios.min.js”></script>
Tạo một request với Axios
axios({
  method: 'post',
  url: '/login',
  data: { user: 'test', lastName: 'test1' }
});
Thực hiện request với phương thức GET
axios.get(url)
 .then(function (response) {
    console.log(response);
  })
  .catch(function (error) {
    console.log(error);
  });
Thực hiện request với phương thức POST
axios.post(url, {
  firstName: 'First name',
  lastName: 'Last name'
})
.then(function (response) {
  console.log(response);
})
.catch(function (error) {
  console.log(error);
});
Các alias tạo request tương ứng với các http method
- axios.request(config)
- axios.get(url[, config])
- axios.delete(url[, config])
- axios.head(url[, config])
- axios.options(url[, config])
- axios.post(url[, data[, config]])
- axios.put(url[, data[, config]])
- axios.patch(url[, data[, config]])
Cấu trúc của dữ liệu trả về Cấu trúc của response trả về từ server bao gồm các thông tin:
{
    data: {}, // dữ liệu trả về từ server
    status: 200,   // mã HTTP status trả về từ server
    statusText: 'OK',   // text mô tả status từ server
    headers: {},   // các header mà server phản hồi
    config: {},   // các cấu hình khi thực hiện request
    request: {}  // là request thực hiện để nhận được response này
}
Ví dụ sử dụng axios
1. file routes/index.js
 router.get('/ax1', (req, res) => {
  res.render("ax1_listusers");
});
2. Tạo file views/ax1_listusers.ejs
<script src="https://unpkg.com/axios/dist/axios.min.js"></script>
<div id="listuser"></div>
<script>
 var url = "http://localhost:3000/users/";
 axios.get(url)
  .then(function (response) {
   // console.log(response);
    let str="";
    for (i in response.data) {
        let motuser = response.data[i];
        console.log(motuser);
        str +=  "<p>"+  motuser.ho + " " + motuser.ten  +"</p>";
    }//for
    document.getElementById("listuser").innerHTML += str;
   })
  .catch(function (error) {
    console.log(error);
  });
</script>
3. Test: http://localhost:3000/ax1 , sẽ thấy danh sách users
Luyện tập: Mời bạn thực hiện luyện tập nhé:
Bài 1: Tạo form đăng ký, khi nhắp vào sẽ lưu vào database. Định dạng form cho đẹp nhé
Bài 2: Tạo trang xem chi tiết user có id là 1. Sau đó cải tiến thêm: lấy id của user từ địa chỉ để hiện thông tin của user đó trong trang. (Định dạng cho đẹp nhé)
Bài 3: Tạo form cập nhật user với id user là 1, khi nhắp vào sẽ cập nhật vào database
Bài 4: Tạo trang hiện danh sách users